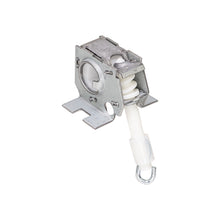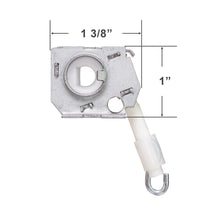
Levolor Wand Tilt Mechanism for Riviera 1" Mini Blinds
Search ID: 5505 SKU: TILTER-004
Mini blind wand tilt mechanism that fits 1" Levolor Riviera blinds.
Comes with the plastic sleeve and metal hook attached.
Accommodates a 5/16" D-shaped semi-circle rod.
This tilter has an internal clutch that prevents over-tightening and part failure. Be sure to watch our video here to learn how to properly set this tilt mechanism before installation.
Silver metal and white plastic.
Sold individually.
Levolor part # K11A0000.
| Product ID | |
| SKU | TILTER-004 |
| Color | Silver |
| Sold By | Each |
| Material | Metal, Plastic |
| What's Included | One wand-driven tilt mechanism. |
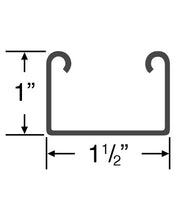
| Headrail Size | 1" x 1 1/2" |
| Tilt Rod Shape | D-shape, half-moon, or rounded triangle |
| Tilt Rod Size | 5/16" |
| Size of the Punch in the Head Rail | 3/8" |
| Shape of the Punch in the Head Rail | Round |
| How is Tilt Mechanism Operated? | Wand |
| Gear Type and Material | Plastic |
| Headrail Size | 1" x 1 1/2" |
| How Does Wand Attach to Tilt Mechanism? | Hook/Sleeve |
| Blind Type | Mini Blind |
| Brand | Levolor |
| Product Line | Riveria (Levolor) |
| Country of Manufacture | |
| Weight (Pounds) | 0.0800 |
| Processing Time | 1 Business Day |
| Shipping Origin | Colorado Springs, CO |
| Eligible for Free Shipping on Orders Over $150 | Yes |
| Warranty Information | 90 Days |
| Eligible for a Return | Yes |
Window coverings that use a standard operating lift cord system pose a strangulation hazard to children.
- Limiting access to the cord or bead chain loops is a simple way to make these window coverings safer for kids.
- Cords should be made as short as possible.
- Keep all cords separate, putting only one cord in each tassel.
- If your window covering uses cord condensers, install them within 3” of the cord lock.
- Install cord cleats at least 5 feet above the ground, and wrap your cords around them every time you raise and lower your window covering.
- Install safety washers to prevent hazardous loops from forming on blinds with accessible inner cords.
- Replace cord tilt mechanisms with wand tilt mechanisms.
- It is safest to replace corded window coverings with cordless ones with inaccessible cords (look for the “Best for Kids” certification label) or remove them altogether.
- Move all cribs, beds, furniture, and toys away from corded window coverings, especially in bedrooms and sleeping areas.


 WARNING: