Video ID: 181027
How to Restring a Comfortex Top Down Bottom Up Cellular Honeycomb Shade
Introduction
If your Comfortex top down bottom up honeycomb shade is not raising and lowering properly, and a lift string is frayed or broken, the shade will need to be restrung. This guide walks you through step by step how to remove and replace all the lift string on a Comfortex top down bottom up cellular honeycomb shade.
A Note on Safety
Kids can strangle in blind cords. To make your blinds safer for kids, keep cords out of reach and secure cord and bead chain loops. To learn more, please visit our child safety guide.
Tools Needed

Scissors
Flat Head Screwdriver
Tape Measure
Rubber Bands
Tape


Step 1 – Note which lift strings move the top down and which lift strings move the bottom up.


Step 2 – Remove the shade from your window, and lay it on a flat surface.


- Comfortex cellular shades are removed by pushing back on the top rail and then rotating the bottom of the top rail forward.
Step 3 – Compress the middle rail and bottom rail with rubber bands.


Step 4 – Remove the condensers and tassels and set them aside for reuse.


- Use scissors to cut the string you are removing to make this step easier.
Step 5 – Remove the end caps from the bottom rail and set them aside.


- You may need to use a flat head screwdriver to get the end caps out.
Step 6 – Remove the end caps from the middle rail, and cut the lift strings connected to them.


Step 7 – Remove the excess string from the middle rail end caps.


Step 8 – Slide the bottom rail off.


Step 9 – Remove any tape from the bottom of the fabric and cut the lift strings if necessary.


Step 10 – Remove any excess lift string from the plastic washers and save the washers for reuse.


Step 11 – Pull the lift strings out of both ends of the headrail, and discard it.


Step 12 – Remove the cord locks from both ends of the head rail and set the locks the side they belong.


Step 13 – Slide the two pieces of the top rail completely apart.


Step 14 – Place the four sections on the table as shown in the picture.

- You may need to use a flat head screwdriver to get the end caps out.
Step 15 – Determine the length of string needed.


- Measure the length and width of the window.
- Determine the number of lift strings in the shade.
- Use the following formula to determine the amount of string needed:
[(2 x Length) +Width] x Number of Lift Strings - You will need to replace all of the lift string on the blind to ensure proper operation.
Step 16 – Cut the new pieces of string.
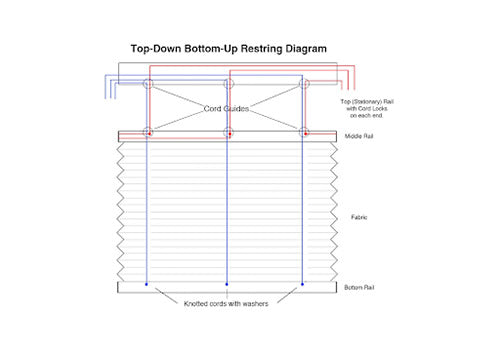
- Diagram of How a Top Down Bottom Up Shade is Restrung
- Note that the lift strings attached to the middle rail go to the right cord lock and the strings attached to the bottom rail go to the left cord lock.
Step 17 – Tie the new top-down strings to the middle rail end caps.


- Slide the middle rail off of the fabric far enough to expose the cord guide.
- Insert the left string into the left side cord guide and the middle string into the middle cord guide, and bring both of those strings out to the left side.
- Insert the right string into the right side cord guide, and bring that string out to the right side.
- Tie the two strings going to the left side onto the left side end cap and the right side string to the right side end cap. Use a double knot and pull each string to make sure they are tight.
Step 18 – Reattach the middle rail end caps with lift strings tied on them to the middle rail.


- Make sure the notches are facing up.
Step 19 – Tie a plastic washer to the end of each new bottom-up lift string.

- Use a double knot to keep the plastic washers secure.
Step 20 – Thread the bottom-up lift strings through the shade.


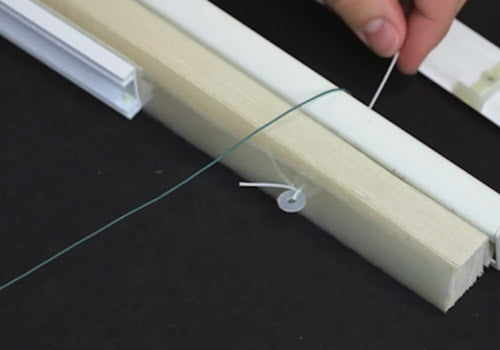
- Thread the folded end of the wire restring tool through the shade.
- Place the string in the eye of the tool, and use the wire restring tool to pull the string through the fabric until the plastic washer is against the fabric.
Step 21 – Repeat steps 19 and 20 for the other bottom-up strings.


Step 22 – Apply a piece of tape over the plastic washers touching the fabric.


Step 23 – Slowly slide the bottom rail back on.


- Take care not to snag the fabric.
Step 24 – Set the bottom of the shade on your work surface.


- Make sure to keep track of which strings go to the top-down function and which strings go to the bottom-up function.
- It may be helpful to wrap rubber bands around the bottom section of the shade for the rest of the repair.
Step 25 – Insert the bottom rail end caps.


- Keep the notches toward the bottom when inserting the end caps into the bottom rail.
Step 26 – Thread the top-down strings through the cord guides on the bottom portion of the top rail.


- Direct each string to the side it goes to.
- Keep the string under the bar of the cord guides.
Step 27 – Repeat step 26 for all of the bottom-up strings.


Step 28 – Examine the lift strings to make sure they are directed to the correct side, and that they are not crossed or tangled.


Step 29 – Apply a small piece of tape on each end of the rail to hold the lift strings in place.


Step 30 – Slide the top part of the top rail over the bottom part of the top rail.


Step 31 – Remove the cover from the cord lock.


- The cover can be easily removed by rotating it up.
Step 32 – Remove the slide from the cord lock.


- Make note of its orientation within the cord lock and set it on your workstation that way.
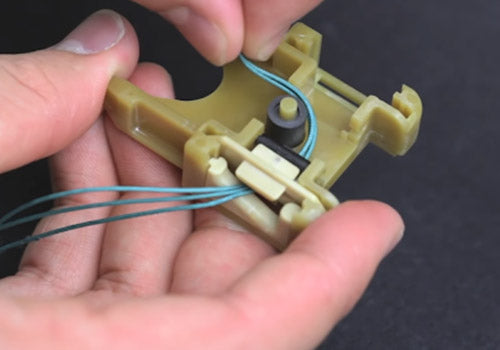
Step 33 – Thread the lift strings underneath the cam on the cord lock.


Step 34 – Replace the slide into the cord lock being sure to orient it the same way it originally was.


Step 35 – Wrap the lift strings around the black roller.

Step 36 – Replace the cover of the cord lock.


Step 37 – Repeat steps 31-36 for the other cord lock.


Step 38 – Remove the tape from the bottom part of the top rail that was holding the lift string in place.


Step 39 – Insert the cord locks into the top rail.


Step 40 – Compress the shade.

Step 41 – Rehang the shade.


- Slide the top front portion of the headrail onto the bracket first.
- Make sure the front tab of the bracket is seated in the slot at the front of the headrail.
- Push the shade back until it is seated in the brackets.
Step 42 – Test your repair by operating both functions of the shade.


Step 43 – With the shade covering the window, reattach the top half of the condensers.


- You can use a plastic washer to secure the knot of lift cord in the condenser more securely.
- The condensers should be approximately 2” below where your shade should stop when it is lowered.
- Test the shade after installing the condenser to make sure it raises and lowers evenly.
- Condensers should be installed within three inches of the cord locks.
Step 44 – Trim any excess lift cord sticking out of the top half of the condenser.


- Leave about ½” sticking below the knot.
Step 45 – Attach the bottom half of the condenser, along with the pull cords and tassels.


