Video ID: 181031
How to Restring a Delmar Pleated or Cellular Shade
Introduction
Your blinds string can become damaged over time for many other reasons. When this happens, you do not always need to replace the shade. You can simply restring your shade using these instructions for Delmar pleated, honeycomb and cellular shades.
A Note on Safety
Kids can strangle in blind cords. To make your blinds safer for kids, keep cords out of reach and secure cord and bead chain loops. To learn more, please visit our child safety guide.
Tools Needed

Flat Head Screwdriver
Lighter


Step 1 – Remove your shade from the window, and lay it on a flat surface.

- The hooks on the top of the clips will snap onto the headrail.
Step 2 – Remove the end cap from the top rail.

Step 3 – Remove the cord lock from the top rail.


- Press a flathead screwdriver into the hole on the top of the headrail to release the lock.
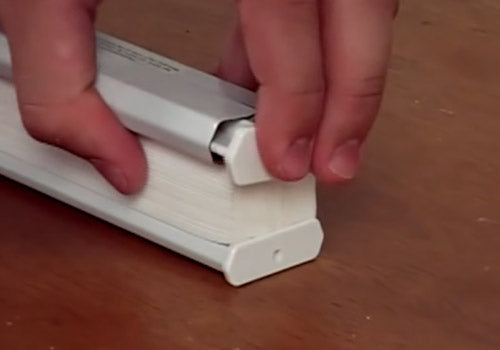
Step 4 – Remove the end caps from the bottom rail.

Step 5 – Slide the top rail off of the fabric away from the cord lock.


Step 6 – Slide the bottom rail off of the fabric.


Step 7 – Cut any strings between the cord lock and the shade.

- If there is string going through the cord lock, do not remove it.
Step 8 – Remove the broken strings from the shade.


- Remember to save all washers or metal stops for reuse.
Step 9 – Cut each new string to the necessary length.

- Twice the height (of your shade), plus the width (of your shade) will give you the exact amount for one lift string. Do this for each lift string on your shade.
Step 10 – Thread the string through the eye of the restring needle.

Step 11 – Tie a plastic or metal washer to the end of each lift string.

Step 12 – Insert the restring needle into the route hole at the bottom of the shade.


- Pull the string all the way through until the washer is seated at the bottom of the shade fabric.
Step 13 – Thread the cord guides.


Step 14 – Slide the top and bottom rails back on, and reattach the end caps.


Step 15 – If you still have string going through the cord lock, use these steps.


- Fuse the new string to the old string using a lighter.
- Next, fuse the other lift string(s) to the same string in the cord lock as well. Carefully pull the cords through the lock.
Step 16 – If there isn’t any string going through the cord lock, use this step.


- Use a Wire Restring Tool to thread the strings through the cord lock.
- Bend the wire restring tool into a “J” shape and insert it between the rollers on the cord lock.
- Thread the strings through the eye of the wire tool.
- Pull the wire tool through the cord lock.
Step 17 – Reinsert the cord lock into the headrail.

Step 18 – Rehang your shade.

Step 19 – Lower your shade until it is extended to the desired length, and trim off any extra string leaving about six extra inches.


Step 20 – Insert the lift cords through one side of the cord joiner, and tie a knot.


- Do not cut the strings until you are sure the shade lowers evenly and completely.